The idea of building a piece of software once and running it everywhere is certainly charming. Go also supports cross-compilation out of the box.
Fyne is a very promising GUI package for Go that helps you build an app with a graphical interface and cross-compile it for almost any device or operating system.
Heres is a quick example
As a quick example, this code gives you a small window with a label and an input field. Grab the code, initialize a module, run go mod tidy, and you're good to go.
 1package main
 2
 3import (
 4	"fyne.io/fyne/v2/app"
 5	"fyne.io/fyne/v2/widget"
 6	"fyne.io/fyne/v2/container"
 7)
 8
 9func main() {
10	a := app.New() // {1}
11	w := a.NewWindow("Hello, you!") // {2}
12
13	l := widget.NewLabel("Hello! What is your name?") // {3}
14	e := widget.NewEntry()
15	e.SetPlaceHolder("Input your name...")
16
17	w.SetContent(container.NewVBox(l, e)) // {4}
18	w.ShowAndRun()
19}
First, on line {1}, we define an app as a. Then, on line {2}, we define a window, w, with the title “Hello, you!”
Then we create a new label (on line {3}) and a new input field, or entry. Both are “widgets,” so their constructors are in the widget package. We set a placeholder for the input field for good measure.
Next, we create a vertical box, which is a container, and on line {4} set it as the content of window w.
When we build and run the program, it looks like this:
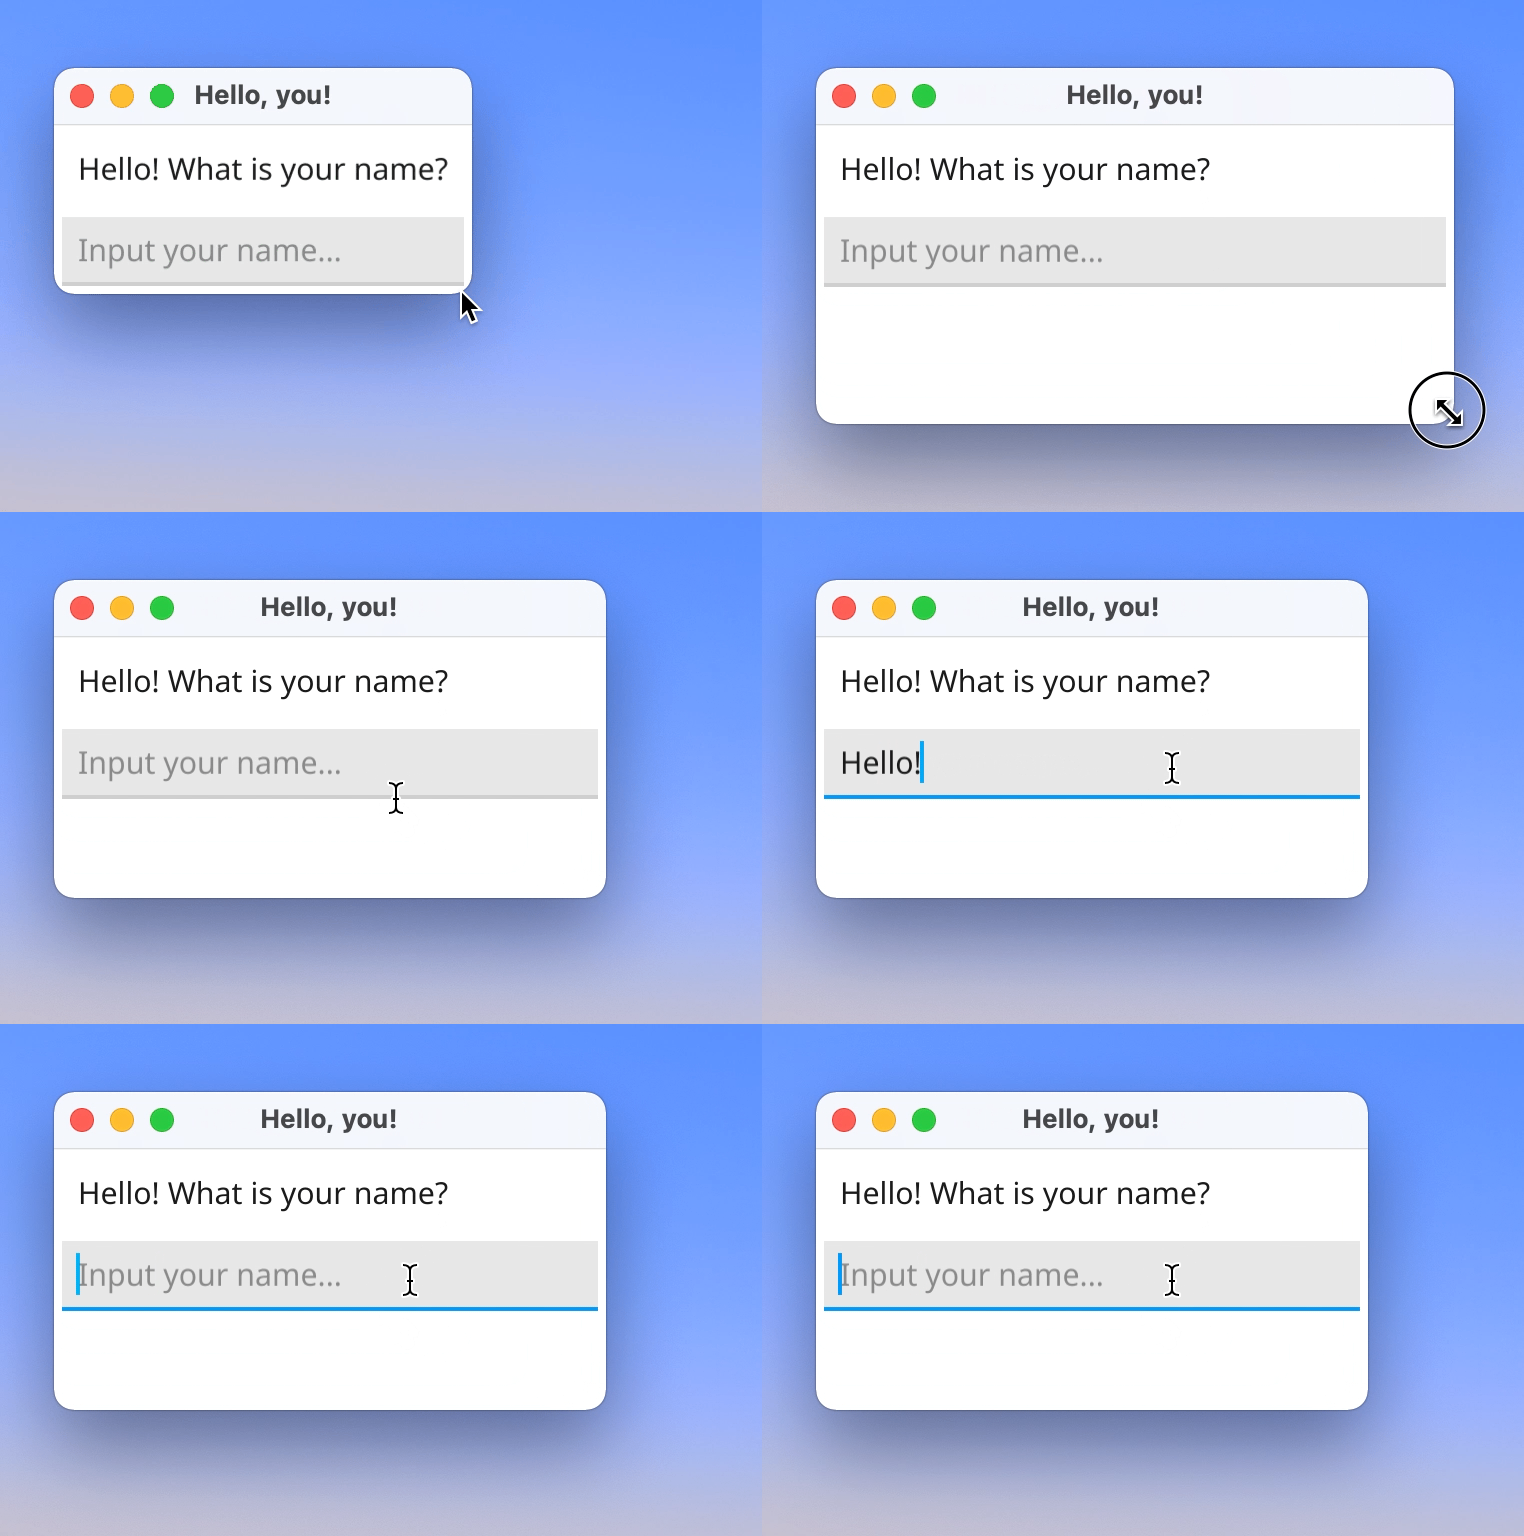
You might have noticed a few quirks. When you resize the window, its contents shiver because Fyne tries to adjust the window size and layout automatically.
When you try to display something that the default typeface cannot render, it appears as a block. CJK characters, Arabic letters, and emojis are all mangled.
Using a custom font
To display Unicode characters correctly, you need to bundle a custom font and include it in your custom theme. The font is then applied globally to your app as part of the theme. From what I read in the issues section, only TTF was supported at the time.
I downloaded Source Han Serif in TTF format and ran this command to bundle it as a resource:
1fyne bundle SourceHanSerifSC.ttf > bundled.go
Next, we get a theme from one of Fyne's demo apps—“Notes.”
The only thing we need to do is change the font name in the Font() method in theme.go:
1func (m *myTheme) Font(s fyne.TextStyle) fyne.Resource {
2	return resourceSourceHanSerifSCTtf
3}
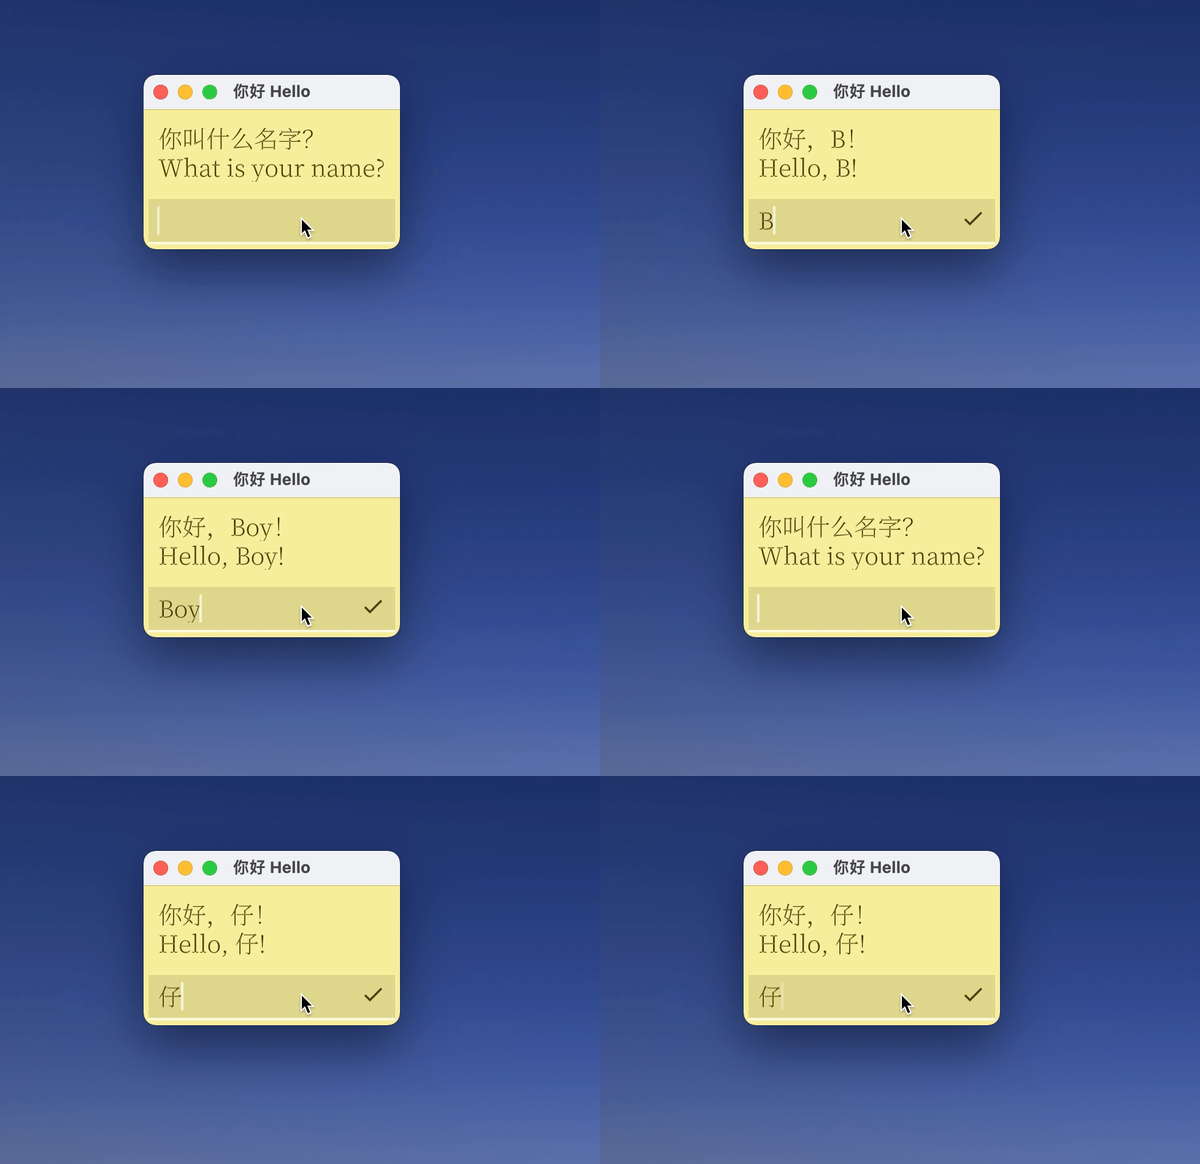
See? Not bad.
Data-binding
I borrowed the theme from Fyne Notes and didn't change its color, which explains the yellow background. The new theme is applied by calling the SetTheme() method.
In this example, whenever the user types in or clears the text field, the greeting changes. This is done by setting up data binding. (If linking two things is “binding,” then the two things are “bound” together. I guess I'll call them “bound variables” and “bound widgets.”)
First, we need to declare bound string variables. Then, we use them to create bound widgets. Note that different methods are used to create the widgets.
At this point, we need to link the two bound variables. Some methods allow bidirectional conversions between a number and a string, and some even support string formats. There's also a method for converting strings to and from URIs.
But it seems that the only way to change greeting whenever userinput changes is to add a listener. To do so, you need to create a data listener from an anonymous function.
With this setup, whenever userinput changes, the callback function runs. Notice how we get and set the value of a bound variable.
 1package main
 2
 3import (
 4	"fmt"
 5	"fyne.io/fyne/v2/app"
 6	"fyne.io/fyne/v2/widget"
 7	"fyne.io/fyne/v2/container"
 8	"fyne.io/fyne/v2/data/binding"
 9)
10
11func main() {
12	a := app.New()
13    // Setting the theme. `myTheme` is defined in `theme.go`
14	a.Settings().SetTheme(&myTheme{})
15	w := a.NewWindow("你好 Hello")
16
17    // Declare two binding string variables
18	greeting := binding.NewString()
19    userinput := binding.NewString()
20
21    // Adding a listener
22	userinput.AddListener(
23		binding.NewDataListener(func() {
24			if val, ok := userinput.Get(); val == "" || ok != nil {
25				greeting.Set(
26                    "你叫什么名字?\nWhat is your name?"
27                    )
28			} else {
29				greeting.Set(
30                    fmt.Sprintf("你好,%s!\nHello, %s!", val, val)
31                    )
32			}
33		}))
34
35    // Creating binding widgets
36	l := widget.NewLabelWithData(greeting)
37	e := widget.NewEntryWithData(userinput)
38
39	w.SetContent(container.NewVBox(l, e))
40	w.ShowAndRun()
41}
A few words
I tried two other pure-Go GUI packages: Gio and Nuxui. Both are ingenious projects. (Quite a few other packages help connect Go apps to more established GUI engines.)
Gio seems much more flexible than Fyne, and the way it uses contexts and channels seems more Go-like. But typing Chinese in the input field simply doesn't work. With a CJK IME, you type a sequence of letters and then choose a character or word from a pop-up menu. Ideally, when an IME is active, keydown events should not be registered. The input field should receive data only when a word has been composed by the IME and “committed,” or selected by the user. But when you type in Gio's default input field, both each letter in the sequence and the committed word are entered into the field. This probably has to do with how Gio handles keyboard events.
Nuxui uses a backtick-delimited string to define the UI declaratively. This is far less cumbersome than calling a bunch of nested constructors. I didn't spend too much time on it because versions 0.6 through 0.8 introduced breaking changes to some basic functions, causing some sample projects to fail to compile.
I spent the most time on Fyne because it is the best-documented of the three. There are a few demo videos and even a book!
Fyne is designed with unit testing in mind. It provides helper functions for mocking events and supports snapshot comparisons to verify that the UI renders correctly.
Fyne is also well structured—so much so that it occasionally feels overly boilerplate-heavy.
All in all, Fyne is great and very promising. I had a great time playing with it, and I'm sure you will too.